
Print Spiral

 Print Spiral

Send Feedback

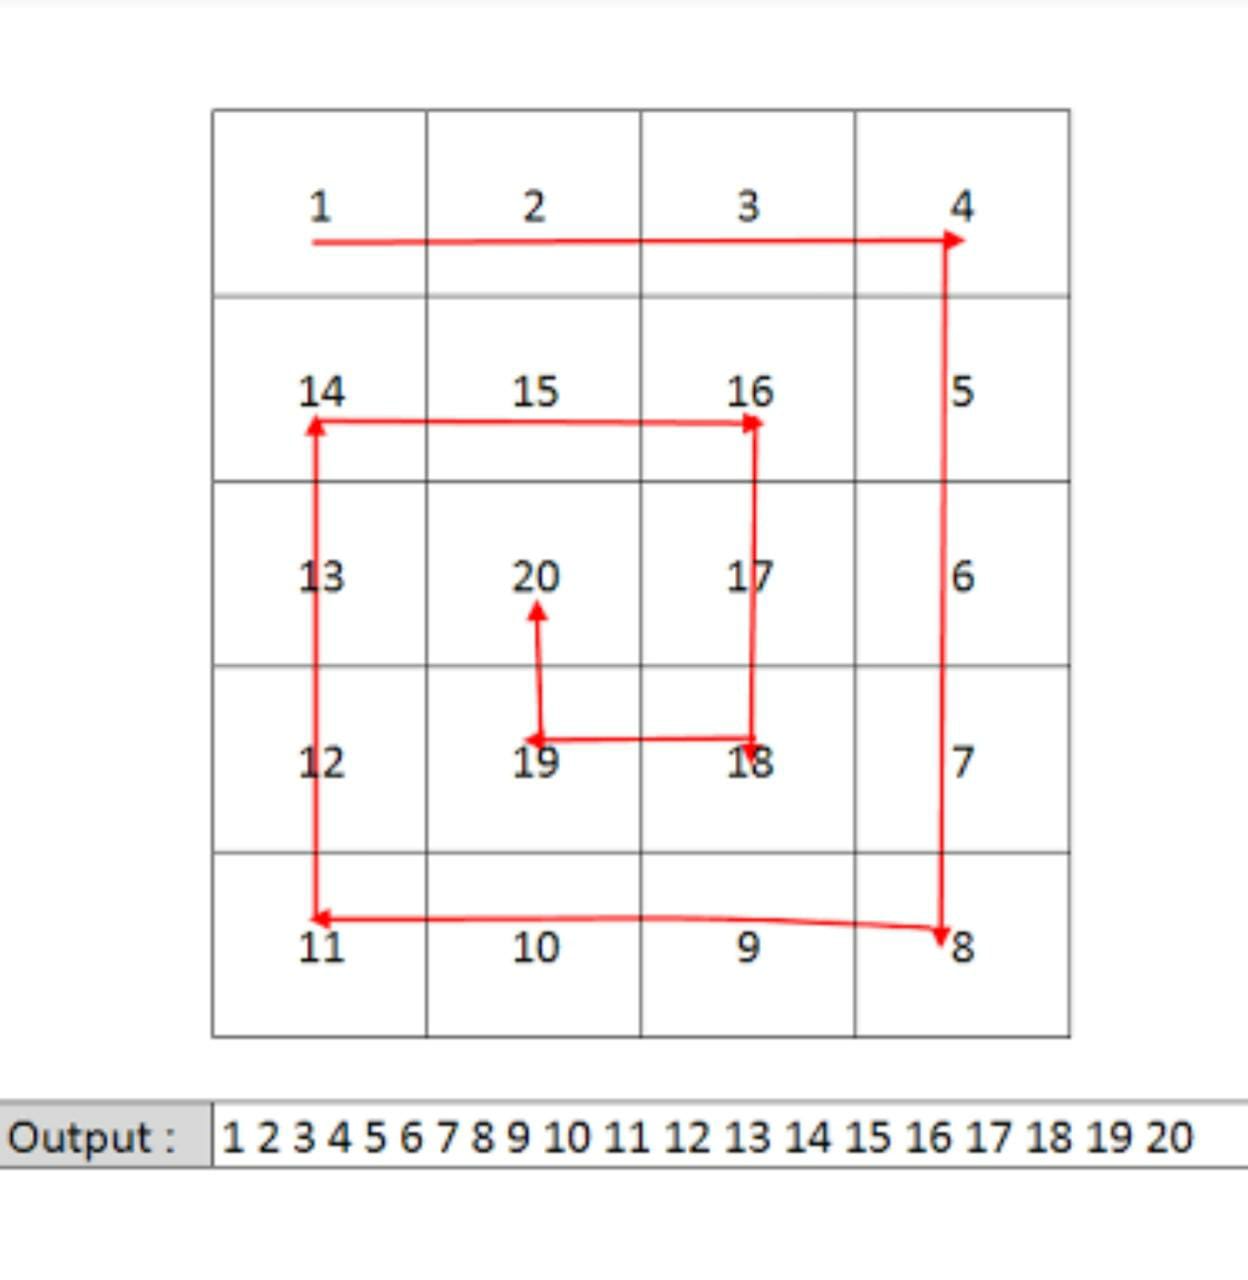
For a given two-dimensional integer array/list of size (N x M), print it in a spiral form. That is, you need to print in the order followed for every iteration:

a. First row(left to right)
b. Last column(top to bottom)
c. Last row(right to left)
d. First column(bottom to top)

 Mind that every element will be printed only once.

Refer to the Image:

Spiral path of a matrix

Input format :
The first line contains an Integer 't' which denotes the number of test cases or queries to be run. Then the test cases follow.

First line of each test case or query contains two integer values, 'N' and 'M', separated by a single space. They represent the 'rows' and 'columns' respectively, for the two-dimensional array/list.

Second line onwards, the next 'N' lines or rows represent the ith row values.

Each of the ith row constitutes 'M' column values separated by a single space.
Output format :
For each test case, print the elements of the two-dimensional array/list in the spiral form in a single line, separated by a single space.

Output for every test case will be printed in a seperate line.
Constraints :
1 <= t <= 10^2
0 <= N <= 10^3
0 <= M <= 10^3
Time Limit: 1sec
Sample Input 1:
1
4 4 
1 2 3 4 
5 6 7 8 
9 10 11 12 
13 14 15 16
Sample Output 1:
1 2 3 4 8 12 16 15 14 13 9 5 6 7 11 10 
Sample Input 2:
2
3 3 
1 2 3 
4 5 6 
7 8 9
3 1
10
20
30
Sample Output 2:
1 2 3 6 9 8 7 4 5 
10 20 30 
CODE FOR THIS 

import java.util.Scanner;

public class Solution {
    public static void spiralPrint(int matrix[][]) {
        int numRows = matrix.length;
        if (numRows == 0) {
            return; // Matrix is empty, nothing to print
        }

        int numCols = matrix[0].length;
        int top = 0, bottom = numRows - 1, left = 0, right = numCols - 1;

        while (top <= bottom && left <= right) {
            // Print top row (left to right)
            for (int i = left; i <= right; i++) {
                System.out.print(matrix[top][i] + " ");
            }
            top++;

            // Print rightmost column (top to bottom)
            for (int i = top; i <= bottom; i++) {
                System.out.print(matrix[i][right] + " ");
            }
            right--;

            // Check if there are more rows to print
            if (top <= bottom) {
                // Print bottom row (right to left)
                for (int i = right; i >= left; i--) {
                    System.out.print(matrix[bottom][i] + " ");
                }
                bottom--;
            }

            // Check if there are more columns to print
            if (left <= right) {
                // Print leftmost column (bottom to top)
                for (int i = bottom; i >= top; i--) {
                    System.out.print(matrix[i][left] + " ");
                }
                left++;
            }
        }
    }

    public static void main(String[] args) {
        Scanner scanner = new Scanner(System.in);
        int t = scanner.nextInt(); // Number of test cases

        for (int i = 0; i < t; i++) {
            int n = scanner.nextInt(); // Number of rows
            int m = scanner.nextInt(); // Number of columns
            int[][] matrix = new int[n][m];

            for (int j = 0; j < n; j++) {
                for (int k = 0; k < m; k++) {
                    matrix[j][k] = scanner.nextInt();
                }
            }

            spiralPrint(matrix); // Print the matrix in spiral form
            System.out.println(); // Move to the next line for the next test case
        }
    }
}

Comments

Popular posts from this blog

Add Image To Blog Page

  Add Image To Blog Page Send Feedback Your blog now looks better and seems to be readable. After knowing how to add an image, you will now do the same in your blog. So let's add all the images required to your blog. Images to be added are provided at the end of this problem. Remember to add appropriate alternate text as well. Some text also need to be added to the blog, so add it as well. For where to insert them, look at the expected look of the page and add them to their appropriate positions, as shown below- The required images are - code for this question  <!DOCTYPE html> <html>     <head>          <img src = "https://ninjasfiles.s3.amazonaws.com/0000000000001394.png">         <p>blog codingninjas.in</p>         <p>blog Coding Ninja Offical Blog</p>         <img src = "https://ninjasfiles.s3.amazonaws.com/0000000000001395.png"...

Code: Form Input Types

  Code: Form Input Types Send Feedback For now, we have created a simple form. But there is a problem that the inputs can take any value other than what they are meant to be. So, we need to change the type of the input element for proper functioning. Your task is to change the type of input according to the meaning of each of them. The meaning of each input element is provided below - 1. Comment - to provide a comment for the blog 2. Name - the name of the person who wants to comment on the blog. 3. Email - to provide the email id of the person. 4. Website - to provide the link to a website that belongs to the above said person. The expected output is - code for this  <!DOCTYPE html> <html>     <head>         <title>Best Coding Practices</title>     </head>     <body>         <div>             <header>       ...

Add View Section to Blog

  Add View Section to Blog Send Feedback Let's add a view section ( using a div tag ) to our blog, which represents the number of visits to our blog. Although it would be static for now, we can change it to dynamic later. So, we will use some text formatting tags to add the views section. The instructions are provided below. Note: The text formatting tags are always inline. Instructions to follow - 1. Add a separate view section (using a div tag ) inside the article in the container (div tag )of the first image of the article. 2. Now, add 2 span's with content as: 'Views:' and '1,137'. Make these span's bold using the appropriate text formatting tag. Expected Blog page is - <!DOCTYPE html> <html>     <head>         <title>Best Coding Practices</title>     </head>     <body>         <div>             <header>       ...